You will need two important measurements from the child. This won't be easy to do with wiggly toddlers! It is a good idea to take measurements while your child is distracted with a movie or a favorite toy.
Outseam:
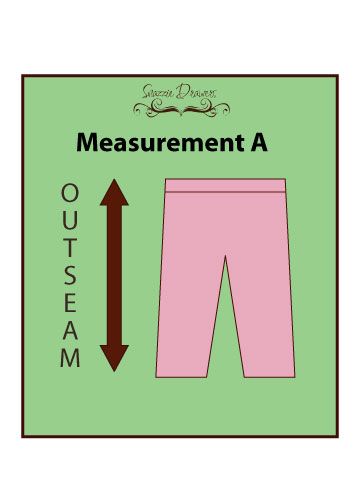
The outseam measurement provides the pant length. Take the tape measure and run it outside of the child's leg. Start at the top of the waist and end at the ankle bone or top of the shoe. Add 1" to this measurement and you have the child's pant outseam measurement. You can also simply take a pair of pants that fit the child perfectly in length and measure from the top of the waist of the pant to the bottom of the hem. Do not add 1" to this measurement to get the outseam. The number you get from either method will be measurement A for this tutorial.
Example: Ava's outseam is 24" from her waist down to her ankle bone. I will add 1" so my measurement A= 25".
Waist:
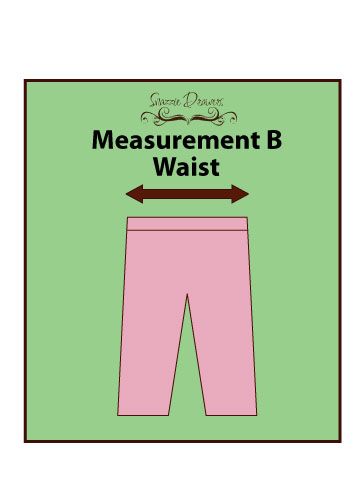
A super easy and fun way to get a child's waist measurement is to have them bend at the side. The natural crease that forms on their side directly above the belly button and below the ribcage is where there waistline falls.
Take your measuring tape and measure all of the way around the child at the waist. If the child is not present or you are unable to get them to be still, then you can also simply measure around a well fitting pair of pants at the waist. Jot that number down. This will be measurement B for this tutorial.
Example: Ava's waist measurement is 20" all of the way around her natural waistline.
CUSTOM fitting their OUTSEAM:
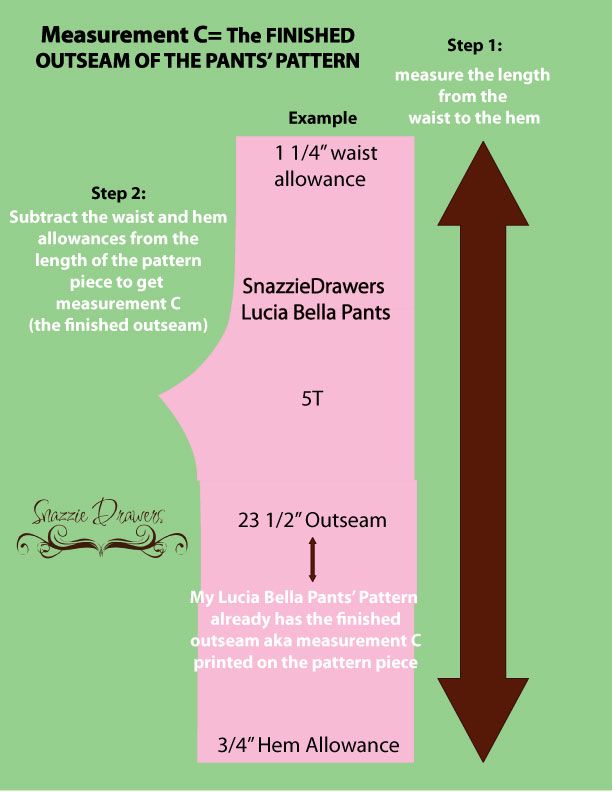
When making a pant pattern to custom fit a child's outseam, simply measure the length of the PATTERN piece in their SIZE. Subtract the WAIST and the HEM allowance from this measurement. This will be the finished outseam of the PATTERN. This will be measurement C for this tutorial.
Example: In the Lucia Bella Pants Pattern, the finished outseam is already printed on the pattern piece so you don't have to worry about subtracting the waist and hem allowance. Ava is a size 5 in these pants and the outseam for this size is 23.5" so my measurement C=23.5".
Now subtract measurement C from A. This will be measurement D which represents the difference in the two. If you have a positive number, then you need to add the amount of measurement D to the pant pattern piece length at the bottom of the hem before cutting your fabric.
If your measurement D is a negative number, then subtract it from the pant pattern piece length at the bottom of the hem before cutting your fabric.
Example: Ava's measurement A was 25" and my measurement C=23.5".
25"- 23.5" = 1.5" so Ava's measurement D is 1.5".
Therefore, I need to add 1.5" to the pant pattern piece hem length before I cut out my fabric. You DO NOT want to add the 1.5" to the top of the waist, because it will cause the pants to sag in the crotch.
CUSTOM fitting their WAIST:
This is a cinch. When you cut out your elastic, subtract 3" from measurement B (their waist). Cut your elastic this length.
If in doubt, insert the elastic with a few inches to spare into the pants waistband casing. Before sewing the elastic, try the pants on your child and ask them when the waist feels most comfortable as you adjust the elastic. You can pin it in place with a safety pin as you determine a nice fit.
Don't let "custom" fitting scare you away from a great fitting pair of pants for your customers or kids. Your customers will be more than happy to have someone willing to go the extra mile and will more than likely be a repeat customer in the future. If you are selling your creations, I recommend creating a spreadsheet or database with your customers' children's measurements so when they come back to order more, they won't have to retake the measurements and it will be easier for both of you. Your customers and children will enjoy your creations more if you ensure they will fit well.
If you are making these for your children, store the measurements somewhere easy for you to access in your craft area or studio.
Let me know if you have any questions!
Snazziedrawers@gmail.com


6 comments:
Thanks so much for this! This is awesome! I'm just really getting into sewing but don't like following patterns (never have) : ) Where did you learn to make patterns?
Thanks for this tutorial! I can't wait to use this! :)
Thank you!
Patternmaking textbooks and 100% self taught.
Awesome!! Thanks Joy!
xxoo
fantastic. you are amazing!! I made the first thing from the set of patterns I bought from you. They are completely and totally awesome by the way. xo
Joy!
Thanks btw for your sweet message, and I absolutely think we have much in common! My girls have the same problem with pants so I have designed something very similar to this for them awhile back! It really helps to be able to do exact length and waist (with growth) for my tall drinks of water!
My oldest is really more the height of an 11 year old and she just turned 9! (Wonder where she gets that from!?) My husband is 6'7" and I am 5'11" so they don't have a prayer! Love your patterns and would love to let our creativity mingle together someday! Keep it coming!
Blessings,
Angela
Post a Comment