How To Make "The" Rolled Flower Tutorial
Supplies Needed:
- Strip of fabric at least 3" wide by ~30" long
- 1.5" felt square
- Hot glue gun

Hmmm. What?? You've seen these before? Of course you have! These flowers are EVERYWHERE you look. They are super popular on Etsy and rampant all over the internet. Why? Because they are quick and EASY! I have had dozens of requests for a tutorial on how to make these. Since this is such a popular and prevalent design, I have decided to give you this tutorial for free! These are super easy and meant for the absolute beginner crafter. And for all you "non-crafty" people, here is the best part:
They require NO sewing! Not a single stitch!
So let's dive right in...
Take a piece of scrap fabric (I am using dupioni silk I purchased from High Fashion Fabrics).
Cut a small slit 3" over from the left edge of your fabric as shown below in the photo.

Then, rip the fabric all the way down to the other end. Do not cut it, rip it! My piece is 33" long so in the end I have a 3" by 33" strip.

*Note: You can use any strip length. The shorter your strip, the smaller your flower will be. You can also play with the width and increase it from 3" if you want a thicker flower.
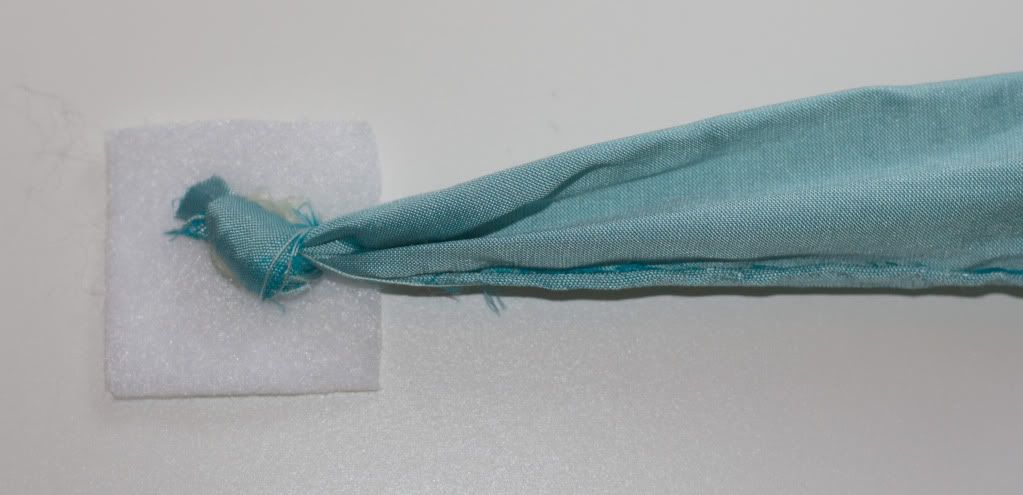
Tie a knot on one end of your strip.

Place a dollop of hot glue in the center of your 1.5" felt square.

Place your knot directly on top of your dollop of glue and hold it in place until firmly secured.
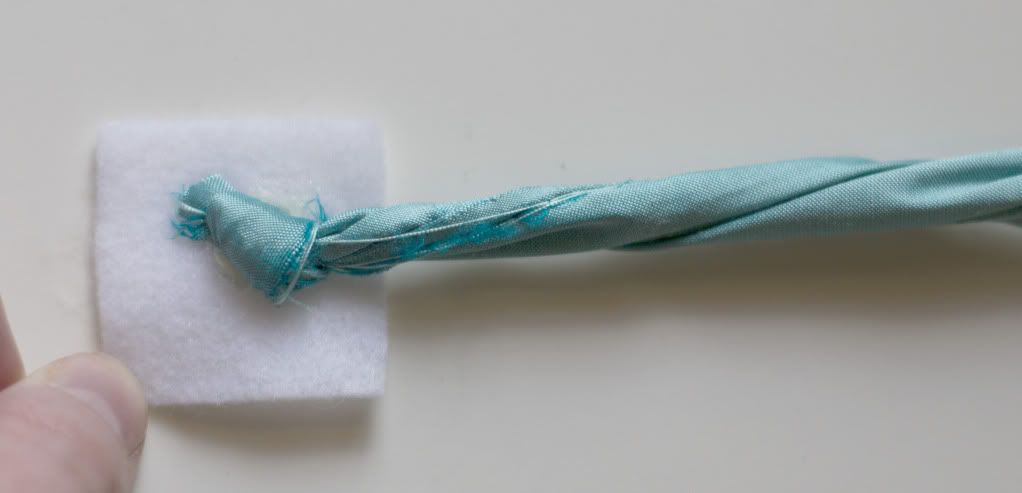
Next we will do a five step process to make the rolled flower.
Before you do any of this, make sure your knot is firmly in place and that the glue is dry.
1st: TWIST your strip. Play around with the twisting to create different effects. A tight twist will create a really flat flower. A looser twist will create a thicker, fuller rolled flower (if you want a fuller flower, I also recommend using a wider strip than 3").
2nd: Lightly GLUE AROUND the center knot in small increments as shown in the photo below. If you don't want to use hot glue, you can use a fast drying Tacky Glue or sew instead. Be careful not to use too much glue, or it will seep through your rolled layers and make a huge mess!

3rd: ROLL your twisted strip around the knot. The glue will secure your rolling in place.

4th: Continue rolling and gluing your twisted strip around the center of the flower as shown below.

5th: When you get to the end of your strip, simply glue the end under the edge of the flower as shown.

Optional: Glue a circle of felt or fabric cut to size onto the back of your flower to leave a finished look.

Now your first rolled flower is finished! You can use these for just about anything! Add lace,
rhinestones, or feathers for a posh polish.
Below are a few inspirational ideas:


Be inspired and make these flowers to your heart's content, but please don't replicate my designs for commercial use with these exact fabrics and color combinations. Enjoy!


34 comments:
Thanks Joy! I am going to put these on some of my Dotties Treasures creations. I really needed your instructions! You are awesome for sharing this! Happy Holidays!
Cute Joy! Thanks for posting this, now I have a flower I can do for my girls for their Christmas outfits!!! Thanks!
Fabulous tutorial!
Thanks Dottie! Can't wait to see what you come up with!
Adrienne, I just saw you are preggo again! Girl!! 6 kids!???? You are amazing.
Send me photos everyone!
You kill me with how talented you are. And the little girl is so percious!
As always - awesome! Love that this is looks sooooooo easy! I will make headbands for my girls, maybe put them on "special" christmas presents!
Thank you so much for the tutorial! I cannot wait to make my 1 month daughter some for pictures!!
This looks so easy...I just read your post and I´m already going through my fabrics to try out the tutorial.
Going to try that out right now! Thank you SO VERY MUCH!!
LOVE IT! Guess I need to either have some baby girls of my own or just spoil my friends' baby girls ;)
Absolutely gorgeous! I love how girly girl your designs are, very helpful to a mommy of many boys and my first girl!
This tutorial is great. I learned to make these at an activity and they didn't knot it and said to go tight. HUGE difference. I made an UGLY dupioni flower. SAD! The top cream flower with the rhinestone on it, is that an upcoming pattern or one I missed? I like it too!
A) your daughter is gorgeous!
B) I just bought my daughter the same sparkly pink top!
C) Love the stamped ribbon you use
D) my rosettes never come out nearly as cute as yours!
Hope you had a great Thanksgiving! Take care!
xo,
Heather
www.afdjewelry.com
You are so clever with such impeccable taste Joy! I love those colors and it looks like you are having fun with your new camera. I used a tutorial on line that was not as good as yours for these rolled flowers.
Thanks for sharing. It is really helpful!
Sarah
Thank you so much for this!!! I saw a local tv station give a quick tutorial on this but you always do a much higher quality job on everything you do! I can't wait to try it out. That cream headpiece is amazing! It matches your daughter I guess ;)
Stacey, the top flower is coming soon as a tutorial. Thanks!
Heather, you are awesome and the girls LOVED their necklaces BTW! They were a hit!
Sarah, I dreamed about ballet all night last night for some strange reason. lol
Thanks everyone for your sweet comments!
Yay! Thanks for this tut!
So excited to try this! Thanks for the love for us non-sewing gals.
My daughter sent me this link.... really looks easy and SO pretty! With a new granddaughter in the "mix" I can not wait to try this. Thanks for the easy instructions. Sharon
I LOVE it and can't wait to try making it! How do you attach them to the headband?
Jessica, I would just hot glue or sew them to a headband. If you are attaching more than one together, sew or hot glue them first onto a piece of felt and then trim the felt away.
Hi there. I was wondering what type of headband.....is it elastic or a headband?
Love your stuff!! Tiffany from CA
Thank you so much! I really needed this pattern. It is so generous of you to share this and your little girl looks like an angel!!
I need all your floral patterns!
Jurene
I bought 5 of your pattern and I made only 1 so far but is pretty easy. I am looking forward for more. Thank you
I was also wondering how to assemble the flowers with the headband. I recently made a 3 flower rolled headband. It turned out pretty cute - I glued it then sewed it, but it was so thick to sew through!!! Is there a trick I'm missing? Is there a pattern I can purchase that will explain it (preferably with pictures) a bit more thoroughly? By the way, LOVE LOVE LOVE your work!!!
Awesome tutorial. thanks so much. I have a question when you do the three rosettes you kind of stack the one on the middle on top... how do you get it to stay on top of the other flowers? do you glue it?
awesome...amazing work!!! Thanks so much for the tutorial I can't wait to try it out!
I can't wait to make some of these! Can you share, how you created the first headband pictured? What headband did you use and how is everything attached?
Thanks!
Beautiful! Can you give me some tips on where to find rhinestone pieces for the center of the flowers? Everything I've found seems too high, old costume jewelry, craft stores, etc. Thanks:)
Would you be willing to share where you purchased the petticoat?
oh thank you Joy for the tut on this flower. I just love all the things on your site that you have made. thank you for such great patterns. Look forward to what you come up with in the future....
great tut thanks. i love all the wonderful patterns you have designed and can't wait to see what you design in the future.
thank you so much for the help, I want to try!
Thanks so much for posing this. I love your site and your patterns. Your creations are beautiful!
Post a Comment